Showing posts with label washi tape. Show all posts

Nasa Funuhara - Painting with Tape


Happy Monday & Happy New Year!

Couldn't resist popping in to share a little eye candy / inspiration to look at common materials with new eyes.  Can you believe these portraits are made out of tape?


Artist Nasa Funuhara recreates classic paintings using washi tape. So incredible right? You can see more of her work here, follow on Instagram or visit her online shop.

Spotted over on Spoon & Tamago (a highly recommended read for interesting art, design and culture coming out of Japan.)

mt Washi Tape Grab Bags - Now Available!

Just a quick one to let you know that a limited number of our always popular Washi Tape Grab Bags are now available over on Etsy!


We've gathered some of our favourite mt washi tape designs - Asanoha, Confetti Dots, Shocking Pink, Metallic Gold - and mixed and matched them together into fun sets perfect for getting creative.


Then wrapped them up in lovely paper bags accented with washi tape details and then a layer of confetti goodness! Because a good mail day is worth celebrating!

Grab one while they last!


Send Pretty Mail - Airmail Animals

When sending out mail, do you like to pick a theme and/or colour scheme?


I'm definitely on the theme and/or colour scheme bandwagon. Though the theme doesn't really have to make sense... so long as it looks good!

Here's a fun piece of mail I sent out a few weeks ago - a slightly mad, but oh so pretty, combo of airmail animals.

Airmail stripes + red, white and blue + adorable animals = snail mail magic!


Once I figure out a theme and/or colour scheme. (In this case, I used a set of washi tape buttons as my initial colour story inspiration), I like to gather all the bits and pieces I have on hand that match. Then I work from there. Mixing, matching, crafting, editing... until I have a lovely cohesive piece of pretty mail.


I've started experimenting with laminating my washi tape sampler cards - it adds a bit of stability to the cards plus the washi tape doesn't stick. No more wasted tape!


And the samplers again - all packaged up! Plus the aforementioned matching washi tape buttons and a teensy kitty cat envelope (with a snail mail challenge tucked inside!)


Then I made some matching mini envelopes and notes.

I picked up a pile of wonderful origami papers in Japan - these translucent stripes and dots are perfect for crafting cute envelopes - two for little notes, and one that can be used by the recipient to send her own note!


Add a collection of red, white and blue bits and pieces...
Stickers, labels and adorable Japanese envelopes (plus some cute animal mini cards inside the fishy envelope.)


Then all the bits and pieces piled together and tied with a bow.
A touch of classic red & white baker's twine makes everything better (ahem, fancier), don't you think?


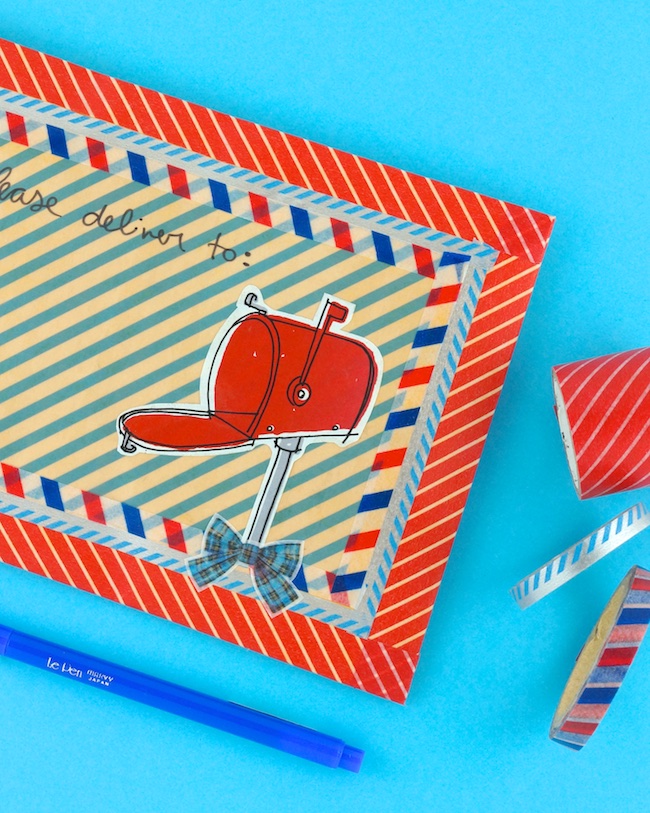
Finally, the envelope - covered in striped origami paper, washi tape and a cute mailbox cut out!

I was really happy with this package - and I hope the recipient was too! It's always fun to take two things that don't necessarily go together and turn them into one cohesive mailing.

How about you? Have you sent any pretty mail lately?

Outgoing Mail - Black, White & Neon Fun!


I'm trying to get back into the habit of sending mail. 

I told myself back in January that I'd send one great package or piece of mail each month in 2016 - a small challenge. But, as is the way, life gets in the way, and suddenly it's May... and I haven't sent a parcel since that first one in January.

So this month, I'm re-challenging myself to actually start sending mail again. It must be all that fabulous snail mail inspiration over on Instagram! First, I put together a couple of bold black, white and pink parcels to send to creative friends... here's a peek...


Whenever I put together a snail mail package, I like to have a jumping off point - a particular card, theme or colour scheme that I then build the various components around. In this case, I was inspired by a set of envelopes I had crafted out of uncoloured colouring book pages. The bold black and white patterns were the perfect place to start.

But then, of course, I couldn't resist adding a bit of colour. And, when in doubt, pink is always the answer!


So I gathered up all my black, white, gold and pink materials and supplies and set about putting together a package I thought anyone would love to receive in the mail. 

An assortment of stickers and buttons and washi tape samples is always fun!


Then added some fun stationery treats - an adorable notebook, a lovely postcard and those aforementioned envelopes.


Finally a hand drawn card to write my message in - because I can't resist an opportunity to doodle flowers! 


And then, time to make the outside of the mail as fun as the inside. 
Washi tape, stickers. doodles and collage elements. I love the final look...


So I had to try it on the back too!

How about you? Where do you find inspiration when sending pretty mail?

Book Giveaway - Paper + Tape: Craft & Create

Now that I've introduced you to my new book "Paper + Tape: Craft & Create" and given you a peek at at some of the projects inside (perhaps you've even tried one or two), I thought it was the perfect time for a book giveaway!

I'd love to share a copy of this project-packed craft book with one of you PLUS a fab grab bag filled with eight assorted rolls of washi tape. Just add some pretty paper and a pair of scissors and you'll be ready for crafty fun!

For a chance to win, simply leave a comment below answering the question:
"What's your favourite thing to create with paper and tape?"

For an additional chance to win, tweet about the giveaway with the tag #paperplustapegiveaway.
For additional chances, pop over to Instagram or Facebook and look for the above photo!

Good luck!

THE FINE PRINT...
Giveaway prize valued at $50.
Giveaway open to Canada / US residents over the age of 18. 
Giveaway closes Sunday, May 15th, 2016 at 11:59pm.
Winner will be randomly selected from all entries on Monday, May 16th, 2016. Winner will have one week after notification to claim their prize. If winner does not claim prize, a second winner will be randomly selected.

Sending Out Pretty Parcels

As I packed up a pile of pretty parcels this week, I couldn't resist snapping a few shots to share with you!


You see, I was wrapping up a big pile of washi tape grab bags...

Which, unfortunately (fortunately),  were snapped up so quickly, I didn't have a chance to share them here. But, as the wrapping of this round turned out so nicely, I wanted to do a little show and tell.


Pretty pretty, right? That's a sticker set on top - placed in a clear flat bag and then sealed with a piece of origami paper as a header card. I'm totally in love with the gorgeous floral paper - it's from a set of origami paper I picked up in Japan!

To replicate this look...
1. Place your gift inside a colourful paper bag. Fold and seal the bag at the bag with your favourite washi tape.
2. Attach a set of assorted stickers (or other flat treat) to the top with more washi tape. Pretty header cards always appreciated!
3. Tie colourful twine around the parcel.
4. Top with a trio of gift tags - first a collage-style tag decorated with washi tape, stickers and a piece of paper doily. Next a triangular tag cut out of polka dot paper. Finally, a bold circular tag punched from bright pink scrapbook paper.  A touch of eighties style, a whole lot of fun!
5. Finish with a lovely twine bow!

You can really use any paper or cardstock as a tag - just punch or cut into the desired shape, then use a holepunch to make a hole for your string.


Then I packed them up in basic manila envelopes to ship across Canada and the world.

But basic envelopes never do around here... I think my personal mantra might just be more is more!


So strips of washi tape plus a medley of stickers were just the thing to fancify these boring envelopes.


Each one dressed in its own unique combo of tape designs and stickers. I do love a good washi tape sticker!

I can't decide which one is my favourite! Can they all be my favourite?

How about you? Have you sent any pretty parcels lately?

Make Shooting Stars! A "Paper + Tape" Project


Here's an excerpt from my new book "Paper + Tape: Craft & Create". Make Shooting Stars out of paper and tape...


Craft a galaxy of pretty paper stars using your favorite shades of washi tape. These stars are simply satisfying to create all on their own, but you can also use them as decorations, gift toppers, or ornaments. Keep it simple with a single star or string together a whole constellation! Prefer to make your stars out of pretty paper? You can fold these paper stars out of any paper you please by using a ratio of 1:12.


TOOLS & MATERIALS
Paper (standard 8.5" x 11")
Washi tape
Glitter tape (thin masking-tape style)
Scissors
Glue
Small hole punch
Twine or ribbon


ARTIST’S TIP
Standard printer or copy paper is perfect for this project. For easy folding, thin paper works best, as the tape adds extra bulk.


STEP 1
Apply one strip of standard-width (5/8") washi tape along the length of the paper. Apply a second slim-width (¼") strip of washi tape next to it so that the two strips of tape are aligned without gaps or overlapping. Cut out the strip. Repeat for as many stars as you wish to make.


STEP 2
Starting at one end, with the tape-covered side facing away from you, fold the top right corner down to meet the left edge of the strip, creating a triangle shape.


STEP 3
Using the first triangle as a guide, continue folding the strip back and forth in a triangular pattern, making sure that the edges align with each fold.


STEP 4
Once the entire strip is folded, it’s time to assemble the star. The slim strip of tape will be the outside edge of the star. To create the star shape, apply glue to the first five inside folds and press each together. Allow to dry.


STEP 5
From the fifth point, count two triangles (one square), and cut off the excess paper. Overlap the two ends to finish the star shape. Make sure that the end with the slim tape strip along the edge is positioned on top. Glue into place, and allow to dry.


STEP 6
To transform the star into a shooting star, make a sparkly tail! Apply three strips of glitter tape to paper, approxi­mately 5” long each. Cut out the tape strips, angling the edges. Then create a fringe by making long cuts from the bottom edge up to about ½" from the top edge.


STEP 7
Punch a hole in the top of each glitter strip. String onto a piece of twine or ribbon; secure with a note. Then punch a hole in the top and bottom of the star. String onto the twine above the glitter tape strips and, if desired, tie a second knot on top of the star.

MAKE IT A GARLAND


The only thing prettier than one shooting star is a whole string of them! Determine how long you’d like your garland to be. Cut a corresponding length of thin ribbon or pretty twine. Attach shooting stars at evenly spaced intervals, approximately 4 to 6 inches apart.


Can't wait to see your galaxy of folded paper stars!