Showing posts with label Halloween. Show all posts

The Kirigami Project - Week 43 - Bonbons


This lovely lacy paper cut looks pretty timeless but was actually inspired by a handful of Halloween candies. I also see diamond rings in there. What do you see?

To create your own Bonbons kirigami design, use the template below and the 6-point folding pattern.

Want to try all of October's Halloween-inspired designs?


This month's free printable is now available!


Click on the image above to access and print the template.

Happy crafting! We'd love to see your versions on social media - don't forget to tag your paper cuts with #thekirigamiproject. You can find us on Instagram at @omiyage_ca & @thelanguidlion

The Kirigami Project is collaborative creative project from Marisa Edghill of Omiyage and Geri Jewitt of The Languid Lion. Marisa creates the kirigami designs and Geri turns them into printable templates. Each week in 2014, we will bring you a new kirigami design to fold and cut. Find the treasury of designs here.

The Kirigami Project - Week 42 - Fangs


This kirigami design is oh-so-pretty until you spot Dracula's fangs. Can you see them? Once you do, they're one of those you-can't-unsee things - and suddenly we've moved from frilly flower into spooky shape territory. Perfect for Halloween!


To create your own Fangs kirigami design, use the template below and the 6 point folding pattern.


Happy Friday & happy crafting!

The Kirigami Project is collaborative creative project from Marisa Edghill of Omiyage and Geri Jewitt of The Languid Lion. Marisa creates the kirigami designs and Geri turns them into printable templates. Each week in 2014, we will bring you a new kirigami design to fold and cut. Find the treasury of designs here.

Make A Bird Mask


Sometimes, I get a project idea which demands to be listened to. Last night, I got the itch to make a feather-y mask out of washi tape. Must be the call of Halloween! Anyway, it turned out quite nicely, so I thought I'd share - maybe inspire you to try something a little different with your washi tape stash too!


A little look at the construction process. I started with a basic handmade mask shape - but a store-bought paper mask would work just as well, if not better. Then I applied layers of washi tape feather shapes around the eyes and up from the nose to the crown. Finished with a few sequins here and there for sparkle and around the eyes to mask (ha ha) tape ends.


Finally, I added a card stock beak - taking the mask from Carnaval extra to magical beast.

A closer look at those layers of feathers - each feather constructed out of a piece of folded washi tape, one end left a little longer for sticking purposes, then cut to shape.


Have you ever tried working with tape in a 3-dimensional way? I also think it's lovely for flowers, pleats and ruffles!

Make Halloween Cards


Halloween is the perfect excuse to send some spooky mail! A simple message written in washi tape is seasonal without being over the top - plus it's a great opportunity to practice cutting words / shapes out of tape.


Want to make your own? Here's how:


You will need:
Washi tape
Blank cards
Parchment paper
Mirror print out of desired text
Marker or Pen
Craft knife and/or Scissors


Start by placing your text print-out face down on the parchment paper. Secure with tape. Flip paper over and trace around outline of text.


Remove print out. Flip paper back over so that marker outline is facing away from you. Cover with strips of washi tape, ensuring each strip slightly overlaps the one before it.


Cut out letters - you can use a craft knife for all cutting or use scissors for outlines and craft knife for enclosed details. Carefully peel letters off of the paper backing and stick to card front. When removing washi tape shapes from a paper backing, always make sure to start from the bottommost piece of tape to prevent shape from coming apart. 


To make your letters "pop" off the page, try layering two cut outs. Love this black with neon combo!


Not into the fiddly-ness of cutting letters out of tape? Simple stripes in seasonal colours are pretty striking all on their own. Or why not add stripes to the back of your spooky sounds cards?


Whether you choose the simple or the pop version, these spooky text cards are sure to be a treat!

Generally, when writing with washi tape, it's a bit easier to work with script than individual letters as you don't have to worry as much about positioning. That being said, script can be a bit trickier to stick to your surface. Here's another project all about writing in script with washi tape.


Will you be sending out Halloween cards this year?

Happy crafting!

The Kirigami Project - Week 39 - Spiderweb


Happy October! This month's kirigami designs are all about classic Halloween shapes. Cute, creepy and oh-so-clever! Hope you like them as much as we do.

One of the most popular DIY posts we've ever published was our Spiderweb Kirigami. I couldn't resist revisiting it just in time for Halloween - this time resized for standard 6-inch origami paper and including a template.

If you're feeling extra spooky, why not cut out a few paper spiders too?


To create your own Spiderweb Kirigami, use the template below and the 6-point folding pattern.
Happy crafting!

The Kirigami Project is collaborative creative project from Marisa Edghill of Omiyage and Geri Jewitt of The Languid Lion. Marisa creates the kirigami designs and Geri turns them into printable templates. Each week in 2014, we will bring you a new kirigami design to fold and cut. Find the treasury of designs here.

Handmade Find - Sundries And Plunder


With Halloween just around the corner, it seemed like the perfect time to share these utterly gorgeous masks from Oregon-based Sundries And Plunder. Handcrafted by sisters Marlo and Chelsea, these leather masks would look just as spectacular as an art piece as they would on.

Let's play favourites! I'm fairly partial to the giraffe. And the snowy owl is pretty magnificent too. Which mask is your favourite?
DIY: Spiderweb Kirigami


If you've been following Omiyage Blogs for awhile, you might have noticed that we love kirigami!

With Halloween around the corner, how about some festive papercutting for the occasion? Try making spiderweb kirigami!


Here's how:

Start with a piece of square origami paper in your desired size.
We used our favourite 50 Colours Origami Paper - the 7.5cm / 3" size.


1. Fold paper in half diagonally. Crease well.

2. Fold paper in half again. Crease well.

3. Turn paper so that the top point is facing down / towards you. Visualize dividing the triangle into 3 equal parts. Fold the right third towards the left. Crease well. Then fold the left third over the right. Crease well. This part may take practice or refolding to get three equal parts - no worries, just keep trying!

4. Cut straight across the top of the folded triangle. Discard the paper parts in red.


5. Cut the top of your triangle into a curve. Discard the red part. Copying the top curve, cut lines along the entire length of the triangle leaving a thin line of paper at the end of each cut. Cut as many strips as you can / would like.

6. Cut out every other strip - seen in red - and discard. Cut off tip. Don't cut off the tip until all other strips have been cut and removed - just in case!

7. Carefully unfold to discover your kirigami spiderweb. If desired, you can gently press with a warm, dry iron to remove creases.


8. Use your spiderwebs anyway you'd like - decorate a table, string into a garland, use in a handmade card.

Happy spiderwebbing! If you cut some spiderwebs of your own, why not share images of your creations on Omiyage's Facebook page!

DIY - No Carve Pumpkin Ideas


We're seeing lots of no-carve pumpkins popping up for Halloween. Here's a handful of our favourites - paint, imagination and some washi tape!

How about you? Will you be decorating or carving pumpkins this year?

Going Batty!

Are you all ready for Halloween? Costume made, house spookified?  For those of you still looking for some Halloween inspiration, here are a few projects and ideas that're driving us batty!

Heather Bailey - Candy & Cornelius Sock Bats
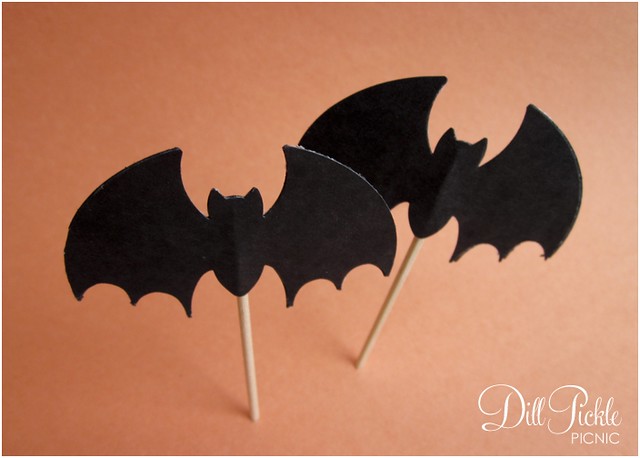
Dill Pickle Picnic - Batty Cupcake Toppers
Martha Stewart - Flying Bat Pinata
Country Living - Haunted Home Bat Decor
Family Fun - Bat-o'-Lantern

We're always looking for great projects.  Seen a fab Halloween idea - or blogged your own - leave us a link, we'd love to check it out!  Happy haunting!