Of course, with all this talk of new babies, we would be remiss not to mention our super cute Welcome New Baby cards from graphic station!
Available in baby boy blue!
And baby girl pink!
These super sweet pop-up cards are full of lovely details. Ribbon accents, pop-up storks and felt toys too!
Sentiments include:
Congratulations on your new baby.
Welcome to the world.
Many blessings to your baby.
Wishing your family a lifetime of happiness.
What else is there to say but, what a sweet way to welcome a new baby to the world! Pick them up in Omiyage's Stationery section.
Showing posts with label Baby. Show all posts
More Sewing for Baby!
Today we're back with some more baby project ideas from around the web. We thought we'd try to inspire you with a little fabric love too. So, without further ado, a collection of sweet baby sewing projects matched up with fabrics from Omiyage!
Give this sweet rick-rack blanket from Prudent Baby a retro Scandinavian vibe with our Red Riding Hood print from Kokka (available in yellow too). While you're visiting Prudent Baby, take a peek through their archives for all sorts of great project ideas - for sewers and non-sewers alike!
After making our first pair of baby shoes, and being overwhelmed by the cuteness level involved, this might just become a sweet go to gift! We're loving all the baby shoe patterns that we've come across, but these seem the most practical! Found on The Long Thread, pattern from Maked, these little shoes are reversible (oh, the possibilities!) Wouldn't they be great in one of Omiyage's elephant prints (available in blue/white, grey/white and natural/pink)?
And let's not forget about Mum! How about this cute diaper bag disguised as a messenger bag? Tutorial found on A Mingled Yarn, via Tipnut. We think this would be fab in one of our Woodland prints from Kokka. Find them in the Omiyage Fabric section!
Or even this great changing pad clutch? Tutorial found on Small Fry & Co. Wouldn't it be super cute in one of our Apple Prints from Kokka. Available in 3 colour ways in the Omiyage Fabric section.
Do you have any fabulous ideas or go to gifts for baby showers, babies and mommas to be? This book is on our pick-up list for even more great ideas! How about you?
Give this sweet rick-rack blanket from Prudent Baby a retro Scandinavian vibe with our Red Riding Hood print from Kokka (available in yellow too). While you're visiting Prudent Baby, take a peek through their archives for all sorts of great project ideas - for sewers and non-sewers alike!
After making our first pair of baby shoes, and being overwhelmed by the cuteness level involved, this might just become a sweet go to gift! We're loving all the baby shoe patterns that we've come across, but these seem the most practical! Found on The Long Thread, pattern from Maked, these little shoes are reversible (oh, the possibilities!) Wouldn't they be great in one of Omiyage's elephant prints (available in blue/white, grey/white and natural/pink)?
And let's not forget about Mum! How about this cute diaper bag disguised as a messenger bag? Tutorial found on A Mingled Yarn, via Tipnut. We think this would be fab in one of our Woodland prints from Kokka. Find them in the Omiyage Fabric section!
Or even this great changing pad clutch? Tutorial found on Small Fry & Co. Wouldn't it be super cute in one of our Apple Prints from Kokka. Available in 3 colour ways in the Omiyage Fabric section.
Do you have any fabulous ideas or go to gifts for baby showers, babies and mommas to be? This book is on our pick-up list for even more great ideas! How about you?
Labels:
Baby,
fabric love,
Internet Inspiration,
Sewing Up A Storm,
Why Not Try
Stamp It: Patterned Onesie
![]() |
| Front of Finished Project |
For this project you will need a plain onesie or shirt, rubber stamps, ink pads suitable for stamping on fabric, an iron. It may also be helpful to have a piece of cardboard to place inside the onesie so that you have something firm to press against.
I used a plain white onesie, stamps from our Kodomo No Kao Springtime Stamp Set, and VersaCraft ink in 2 colours.
![]() |
| Materials Used for This Project |
How to:
1. Wash and dry onesie to remove sizing.
2. Practice stamping your desired pattern on a test piece of fabric. Ensure you understand the amount of ink and pressure needed to get your desired results. I found that for each stamp impression, I had to reink the stamp. When you are satisfied with your test run, begin stamping.
3. If using, place cardboard inside the onesie. Choose a firm workspace like a counter or tabletop. This is not a good project to do on top of your ironing board!
4. On one side of onesie, simply stamp with your first colour / stamp until desired pattern is achieved. Allow to dry between each additional colour. I used the ripple and tadpole stamps from our Springtime Stamp Collection stamped in aqua and lime green for a sweet unisex design.
5. Allow the first side of your onesie to dry, then flip over and repeat stamping on second side.
6. When ink has completely dried, heat set with a hot dry iron. Iron each section of the printed fabric for about 2 minutes. For better results, turn the onesie inside out and iron on the inside too. Use a press cloth if desired. This is an essential step to stop the ink from fading. It is also recommended that you allow the ink to "set" for a week or two prior to washing.
This technique could be applied to all sorts of garments for baby, and there's no need to feel limited to an all over pattern - a simple design on the front of a onesie or t-shirt would be cute too!
Check out all of the fabulous Kodomo No Kao rubber stamps in Omiyage's Crafty section.
Labels:
Baby,
Stamp Fever,
Why Not Try
Kimono Baby Shoes and Matching Onesie
Yesterday, we talked a bit about the desire to gift handmade baby clothes and necessities. But to be honest, as much as we'd like to, we don't always have a lot of time to devote to baby gifts. So, we'd like to share with you some fast, simple project ideas for making your next baby gift extra-special.
Ever since spotting these sweet kimono baby shoes on HomeSpun Threads, I knew that I would need to make them. Not want. Need! Combining tiny little shoes with an elegant kimono wrap construction, just one look and I was sold. Luck would have it that Aimee Larsen, the designer of these wee shoes, is also kind enough to share her pattern. Find it here!
Aimee's Kimono Baby Shoes are really simple to construct. You just need the pattern, 2 or 3 coordinating fabrics and some appliqué adhesive (I used Heat 'n' Bond Lite). For the uppers, I chose a cute Cosmo print, available on Omiyage.ca (but be warned, we only have a little bit of this fabric, and when it's gone it's gone!), an Echino print for the soles and some lovely soft turquoise jersey for the inside of the shoes. I ended up sewing these by hand but imagine that on a machine, this project would take you under an hour.
Of course, sweet little shoes deserve a matching outfit - don't they? Or at least a matching onesie. My first experience with appliqué, and I'm pretty smitten already!
To make your own appliqued onesie to match those new shoes, you'll need a onesie, Heat 'n' Bond Ultra Hold or another appliqué adhesive, fabric of choice.
1. Wash, dry and press onesie and fabric to remove sizing and allow for any shrinkage.
2. If you want your appliqué to be in a specific shape, cut that shape out of the appliqué adhesive. I skipped this step since my design uses the bubbles or circles already found in the fabric design. If you would like to create a similar necklace effect by cutting circles out of fabric, simply cut a piece of adhesive slightly smaller than the piece of fabric you will be using.
3. Follow the directions on the appliqué adhesive packaging and iron the adhesive to your fabric. Allow to cool.
4. When cool, cut to the desired shape. I cut around the bubbles in the Cosmo fabric - you can recreate the look of my project by cutting circles of various sizes from your fabric.
5. Determine your desired layout on the onesie - I went with a faux necklace look. Follow the directions on the appliqué adhesive packaging and iron the appliqué onto the onesie. If using multiple pieces, place and iron one at a time. Allow to cool. That's all!
After doing a fair amount of appliqué research online, I determined that, while it is better to stitch around your appliqué, you can skip this step by using the Ultra Hold adhesive. You may find that the edges of your appliqué start to fray - many people enjoy this look, if you do not, use a Lite appliqué adhesive and sew around the edges of the appliqué. If you choose not to sew around the edges, and over time the edges of your appliqué start to come up, you should be able to press them down again following the directions on the adhesive. I would also recommend using Fray Check around the edges of the no-sew appliqué - you know, to held keep fray in check!
Regardless of whether you choose to sew or not to sew, appliquéd garments should be washed in cold water on the Delicate cycle and tumble dried low on the Delicate cycle.
Check back with us tomorrow for another project idea for baby! Check out Omiyage's fabric section for more great Japanese fabrics!
![]() |
| Materials needed for this project |
Ever since spotting these sweet kimono baby shoes on HomeSpun Threads, I knew that I would need to make them. Not want. Need! Combining tiny little shoes with an elegant kimono wrap construction, just one look and I was sold. Luck would have it that Aimee Larsen, the designer of these wee shoes, is also kind enough to share her pattern. Find it here!
![]() |
| Baby Kimono Shoes in Cute Cosmo Bubbles Fabric |
Aimee's Kimono Baby Shoes are really simple to construct. You just need the pattern, 2 or 3 coordinating fabrics and some appliqué adhesive (I used Heat 'n' Bond Lite). For the uppers, I chose a cute Cosmo print, available on Omiyage.ca (but be warned, we only have a little bit of this fabric, and when it's gone it's gone!), an Echino print for the soles and some lovely soft turquoise jersey for the inside of the shoes. I ended up sewing these by hand but imagine that on a machine, this project would take you under an hour.
![]() |
| Complete kimono baby shoes & appliquéd onesie |
Of course, sweet little shoes deserve a matching outfit - don't they? Or at least a matching onesie. My first experience with appliqué, and I'm pretty smitten already!
To make your own appliqued onesie to match those new shoes, you'll need a onesie, Heat 'n' Bond Ultra Hold or another appliqué adhesive, fabric of choice.
1. Wash, dry and press onesie and fabric to remove sizing and allow for any shrinkage.
2. If you want your appliqué to be in a specific shape, cut that shape out of the appliqué adhesive. I skipped this step since my design uses the bubbles or circles already found in the fabric design. If you would like to create a similar necklace effect by cutting circles out of fabric, simply cut a piece of adhesive slightly smaller than the piece of fabric you will be using.
3. Follow the directions on the appliqué adhesive packaging and iron the adhesive to your fabric. Allow to cool.
4. When cool, cut to the desired shape. I cut around the bubbles in the Cosmo fabric - you can recreate the look of my project by cutting circles of various sizes from your fabric.
![]() |
| Close up of appliqué layout |
5. Determine your desired layout on the onesie - I went with a faux necklace look. Follow the directions on the appliqué adhesive packaging and iron the appliqué onto the onesie. If using multiple pieces, place and iron one at a time. Allow to cool. That's all!
![]() |
| Finished! |
After doing a fair amount of appliqué research online, I determined that, while it is better to stitch around your appliqué, you can skip this step by using the Ultra Hold adhesive. You may find that the edges of your appliqué start to fray - many people enjoy this look, if you do not, use a Lite appliqué adhesive and sew around the edges of the appliqué. If you choose not to sew around the edges, and over time the edges of your appliqué start to come up, you should be able to press them down again following the directions on the adhesive. I would also recommend using Fray Check around the edges of the no-sew appliqué - you know, to held keep fray in check!
Regardless of whether you choose to sew or not to sew, appliquéd garments should be washed in cold water on the Delicate cycle and tumble dried low on the Delicate cycle.
Check back with us tomorrow for another project idea for baby! Check out Omiyage's fabric section for more great Japanese fabrics!
Labels:
Baby,
fabric love,
Why Not Try
Babies on the Brain!
It seems inevitable, doesn't it, that one day you look around you and you're surrounded by a veritable baby boom. Brand new babies, pregnancy announcements, shower invites. We've found ourselves with babies on the brain - but not for us, not yet anyway - Omiyage is our baby for now.
But there's just something about all the accoutrements surrounding new babies. Wee little shoes that can make even the strongest man swoon. Sweet little baby doll dresses that kick our biological clocks into overdrive. The softest of materials that we all long to be cocooned in. Oh baby!
And aren't some of the best presents the ones with a little handmade flair? This week we'll be looking at some simple crafty projects to turn an ordinary baby gift in an extraordinary one!
But first, here's some sweet baby projects we're loving from around the web.
![]() |
| Heather Bailey's Bittie Booties |
![]() |
| Martha Stewart Living's Washcloth Duckies |
![]() |
Aesthetic Nest's Cut Chenille Baby Blanket via Li'l Magoolie |
![]() |
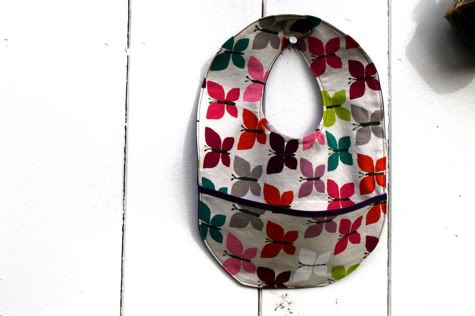
| Prudent Baby's DIY Pocket Bib |
![]() |
| Lotta Jansdotter's Snuggler via Craftzine |
Visit us again tomorrow for our first baby-licious craft idea!
Labels:
Baby,
Internet Inspiration,
Why Not Try
Subscribe to:
Posts (Atom)