
We are thrilled to be sharing this Guest Post from Karen Kelsky of Paper Demon Jewelry with you! Karen creates stunning modern accessories from traditional Japanese materials. Visit our post on Paper Demon Jewelry or head right to Karen's etsy shop to check out all the lovely, Japanese-inspired pieces she creates. Today, Karen has generously offered to teach us how to make a simple but striking chiyogami gem pendant in matching tin. A great gift project to try your hand at as the holiday season approaches!
Chiyogami Gem Pendant in Matching Gift Tin Tutorial
by Karen Kelsky of Paper Demon Jewelry
Supplies:
- Chiyogami paper from Omiyage.ca
- 7/8" glass gems
- 7/8" square craft punch (optional - can also hand-cut paper)
- Aanraku bails in gold or silver
- small glass / acrylic topped jewelry tin
- Diamond Glaze
- Mod Podge
- E6000 Glue
- Scissors
- Toothpick

Step One:
Punch or cut out chiyogami paper in a 7/8" square, centering the pattern that you want on your pendant.

Step Two:
Check the size of the square and trim off any overhanging edges. You don't want any paper at all hanging off the edge of the square, even a tiny bit (it prevents the glue from achieving a perfect, durable bond). The photo below shows excess paper that needs to be trimmed off.

Step Three:
Coat the bottom of the glass with a thin layer of Diamond Glaze, and attach the paper, centering carefully but quickly (Diamond Glaze sets fast!)

Step Four:
Check that you're happy with your image. When dry, coat the back with another thin layer of Diamond Glaze.

Step Five:
While you're waiting for the Diamond Glaze to dry, make the matching tin. Trace a circle in pencil on the same paper as your pendant, using your tin as a guide.

Step Six:
Cut out the circle, and apply Mod Podge (NOT Diamond Glaze!) directly to the printed side of the paper. Press the circle, printed side down, directly into the lid of the tin.

Step Seven:
Check the tin lid to make sure you're happy with it. You can peel out the paper and reapply once if you need to.

Step Eight:
Once your pendant back is dry, you will attach the bail. You have two options - a quick glue option, or a Diamond Glaze option that gives it a more finished look.
a) For the glue option: Just put a drop of E6000 glue on the inside of the Aanraku bail, and press the bail, glue side down, in the center of your pendant. Make sure that you know which side is the top of the pendant!

b) For the Diamond Glaze option: squeeze a dime-sized drop of Diamond Glaze on the back of the pendant. Use the toothpick to smooth it evenly to reach all the edges and corners. Place the Aanraku bail on the top edge, centering it. Use the toothpick to press it down. Wait a few minutes, and then finish by squeezing a small amount of Diamond Glaze over the back of the bail. Press a couple times with the toothpick to make sure the bail has bonded with the pendant (the glaze can make it "float" if it is a thick layer).

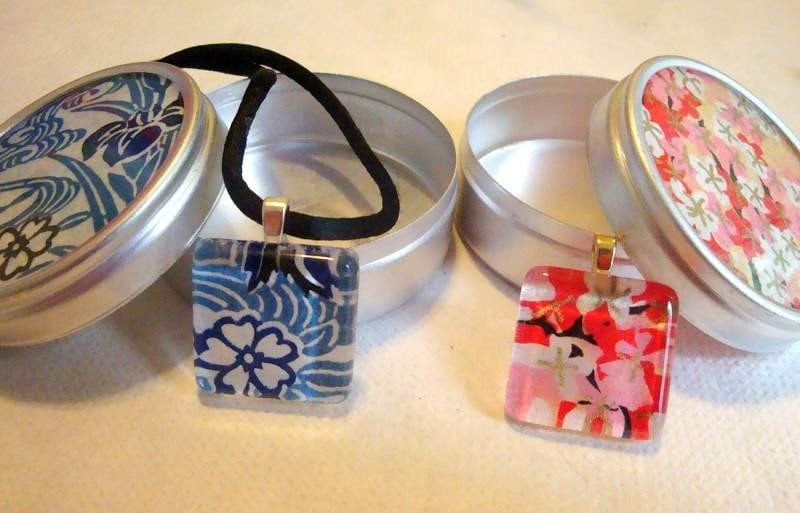
Step Nine:
Hang the pendant on a cord of your choice if you wish. Put a bit of cotton fluff inside the tin, if desired, and place your necklace in the tin, and be prepared for the oohs and aaahs!

For a great variation, glue strong magnets on the back for gorgeous refrigerator magnets! (Neodymium magnets available at Annie Howes).
Recommended sources for supplies
- Chiyogami Paper - Omiyage (the washi paper packs are perfect for this project!)
- Glass Gems: Annie Howes (be careful! There is a lot of bad glass out there, and I've tried them all! Annie Howe's handmade .875 inch square glass are excellent quality!)
- Aanraku Bails: Annie Howes
- Gift Tins: Sun and Moon Crafts or Gami and Glass
- Diamond Glaze: your local hobby shop, Amazon, or various Etsy shops
- Mod Podge: your local hobby shop or Amazon
A huge thank you to Karen for sharing this wonderful tutorial with us. Love the chiyogami gem necklace, but would rather buy it than make it? Not to worry, visit Paper Demon Jewelry on Etsy and you can do just that! And don't forget to check out our full selection of gorgeous Japanese papers on Omiyage.ca!